It's official! In order to expand my blog, I have moved to Wordpress.
Please follow me at diaryofawifemamateacher.wordpress.com :)
Subscribe to get updates on new posts!
See you there!
Amber

Tuesday, July 15, 2014
Sunday, July 13, 2014
DIY Ombré Distressed Mason Jar Tutorial
Ombre. Distressed. Mason Jars. Those three things create the perfect trifecta. If I could rewind to a year ago, I would have had these flooding my wedding scene. Not only are these inexpensive to make, but they are seriously easy. Plus, they are a perfect decor piece. Simply add fresh flowers for a chic look anywhere in your home.


What You'll Need:
Mason Jars...Try searching at your local Goodwill, thrift shops, and garage sales. I was able to snag some for only .69 cents. They are also available at Wal-Mart, Hobby Lobby, and many other chain stores.
Paint...For this particular batch I used acrylic, however wall paint from Home Depot or Lowe's works as well. What's even cooler? Get a perfect match with your home decor color theme by taking in an item for them to color match. You can get a small sample jar for usually under $2. I do find that acrylic works better and is easier to work with.
**This tutorial aims to achieve an ombre effect. If you are planning on doing ombre, you will need to buy 2 bottles of your darkest ombre shade and then 2 bottles of white. If not, just choose your colors and buy 1 bottle for each jar.
Sanding Block...I prefer a coarser grit, however a fine grit will work.
Paint Brush...I used a basic art brush, but a small foam brush works really well. I recommend buying 3. If not, just make sure to rinse your brush out and dry between colors.
Finishing Clear-Coat...I used a Clear Polyurethane Spray, but be sure to make sure it will not yellow or leave a funky coloring on your finished jars. Some sprays will say this on their label so keep an eye out. This does NOT make the jars waterproof or dishwasher safe. It simply gives a nice semi-protective finish and makes the jars wipe-able. You can score this at Hobby Lobby, Michael's, or JoAnns at 40-50% off with an online coupon which makes for a sweet deal!
And here we go...
Prep your jars. Wash them and make sure they are dry.
Because I only purchased one shade of color paint, I must create my ombre shades. I did this rather than buy 3 different shades of green because I wanted them to be in the same color family. To achieve the varying levels of ombre, just add white paint. Paper plates are great because they contain the mess well and make for an easy clean-up. My first shade was only the color paint (green), the second shade was my color paint mixed with a little white, and then my third shade was my color paint mixed with a lot of white. This is something you can play around with until you reach your desired shades. Mix up more than enough because you do not want to run out and have to try and match the shade exactly. Now that would stink. Not doing ombre? No worries, you can skip this step:)


Paint is prepped and we are ready to get this show on the road! Paint one coat. Let dry for at least a few hours. If you do not wait long enough before doing the second coat, your first layer will peel off and make lumps of paint on your jar. Yuck! You may want to cover your paint to prevent it from drying out. If you used a paper plate, you can place the plate in a large freezer baggie.
After they are completely dry. Paint on a second coat.
A third coat may be applied if needed.
**Optional: You can also paint the insides of the jar black or gray to add more contrast or leave them clear.
After painted with 2 coats.

It's time to distress! Use your sanding block to gently sand away areas on your jar. Start with a little. If you go "sanding happy" at first and accidentally sand away too much, it is going to be hard to fix it, whereas if you start small, you can always add more. TIP: Hard fingernail files work well too and allow for more precision.
After being sanded and distressed.

Almost done! This step needs to be done outside for proper ventilation. This stuff smells! Carefully, spray one jar at a time with your chosen clear coat. Read the label for proper directions. Avoid doing this on a day that is super hot or has high humidity as it will make the jars sticky, even when dry. Yes, I have done this before and it ruined my jar. Boo! This step is actually optional. If you chose not to, you can leave the jars with the matte finish it has after your final coat. Just remember, you will not be able to wet wipe it down to clean.

Left- No clear coat
Right- Glossy clear coat

And there you have it.. A perfect decor piece to add to your home. These even make adorable cutlery holders for cook-outs or parties!
The best part is that once you know how to do this technique, you can use it on any glassware items! Pieces with texture work best, like the vase below.

Want the chance to WIN the set featured on this post? Simply follow and comment on this post and one winner will be chosen at random!
And I couldn't help but share a picture I snapped of my little handsome hunk while making these:) You know, just chewing on those newly discovered hands.

I'd love to see your creations!
Enjoy,
Amber
Saturday, July 12, 2014
DIY Barnwood Stain
It's everywhere. That rustic wood stain that everyone wants. Upon going to Lowe's and seeing that a tiny can of wood stain was at least $8, I decided to take matters into my own hands..and the best part? You only need THREE simple and inexpensive ingredients to whip up a batch of stain that replicates old barn wood!

What You'll Need...
White-Distilled Vinegar
Coffee Grounds
Steel Wool
Glass Jar
Yep. That is seriously it.. Pretty sweet, huh?
All you need to do is dump the coffee grounds (about 3/4 cup) into the jar, then place the piece of steel wool in (this will end up dissolving), fill up with vinegar, and mix! Seriously EASY!
It may take minutes to make but it will take a few days to be ready to use. Not dark enough for you? Simply add more coffee grounds or do extra coats until you've reached your desired shade. I've been using this stain for about 2 years and notice that the mixture does darken the longer it "sits" which I really like.
You may have some coffee ground "leftovers" on your wood after painting on the stain...No worries! Just wipe off once the stain has dried. If for some reason your wood is not taking the stain, try to sand it down. Stay away from pressure-treated wood too! Lowe's or Home Depot has cedar fence pickets for under $2 each! This is what I use for nearly all of my projects because it makes for a deal and stains so well.
Uses for this stain are endless and it is the closest thing I have found to replicate that envied rustic look that is popping up all over the place.
It is best to do this outdoors, as it will stain anything it touches. Keep that in mind when completing your own project! :)
Happy Saturday!
Amber
Thursday, July 10, 2014
DIY Handmade Reusable Cloth Diaper Wipes & Bum Bottom Spray

I've officially entered the world of cloth diapers. Never in a million years did I imagine myself ever saying that. Just the thought made me want to get sick..And then I got used to poo. It doesn't even phase me anymore. One of my friends spoke so highly of it that I thought it would be worth a try. Little did I know, I would become obsessed with collecting every color of the rainbow and doing extensive research on every little aspect of cloth diapering.
So here we are..trying out various brands (Charlie Banana and BumGenius ROCK, by the way) and I am quickly realizing that I will forever be in charge of "diaper-changing sessions" as Jordan absolutely despises the whole idea of reusing something you pooed in. I'm sure he will give in eventually.
Something that I realized was a huge hassle was throwing the diaper in the wet bag and then having these random wipes that I would have to get rid of. Sure, I could just throw them in a trash can separately, but I prefer just throwing them in the diaper and being done with it. SO...I decided to make my own reusable cloth wipes last night when Declan went to bed. I was able to make 18 wipes last night in about an hour and a half. I am by no means an expert seamstress, but even these can be made by beginners:)

Handmade Reusable Cloth Wipes
What You'll Need:
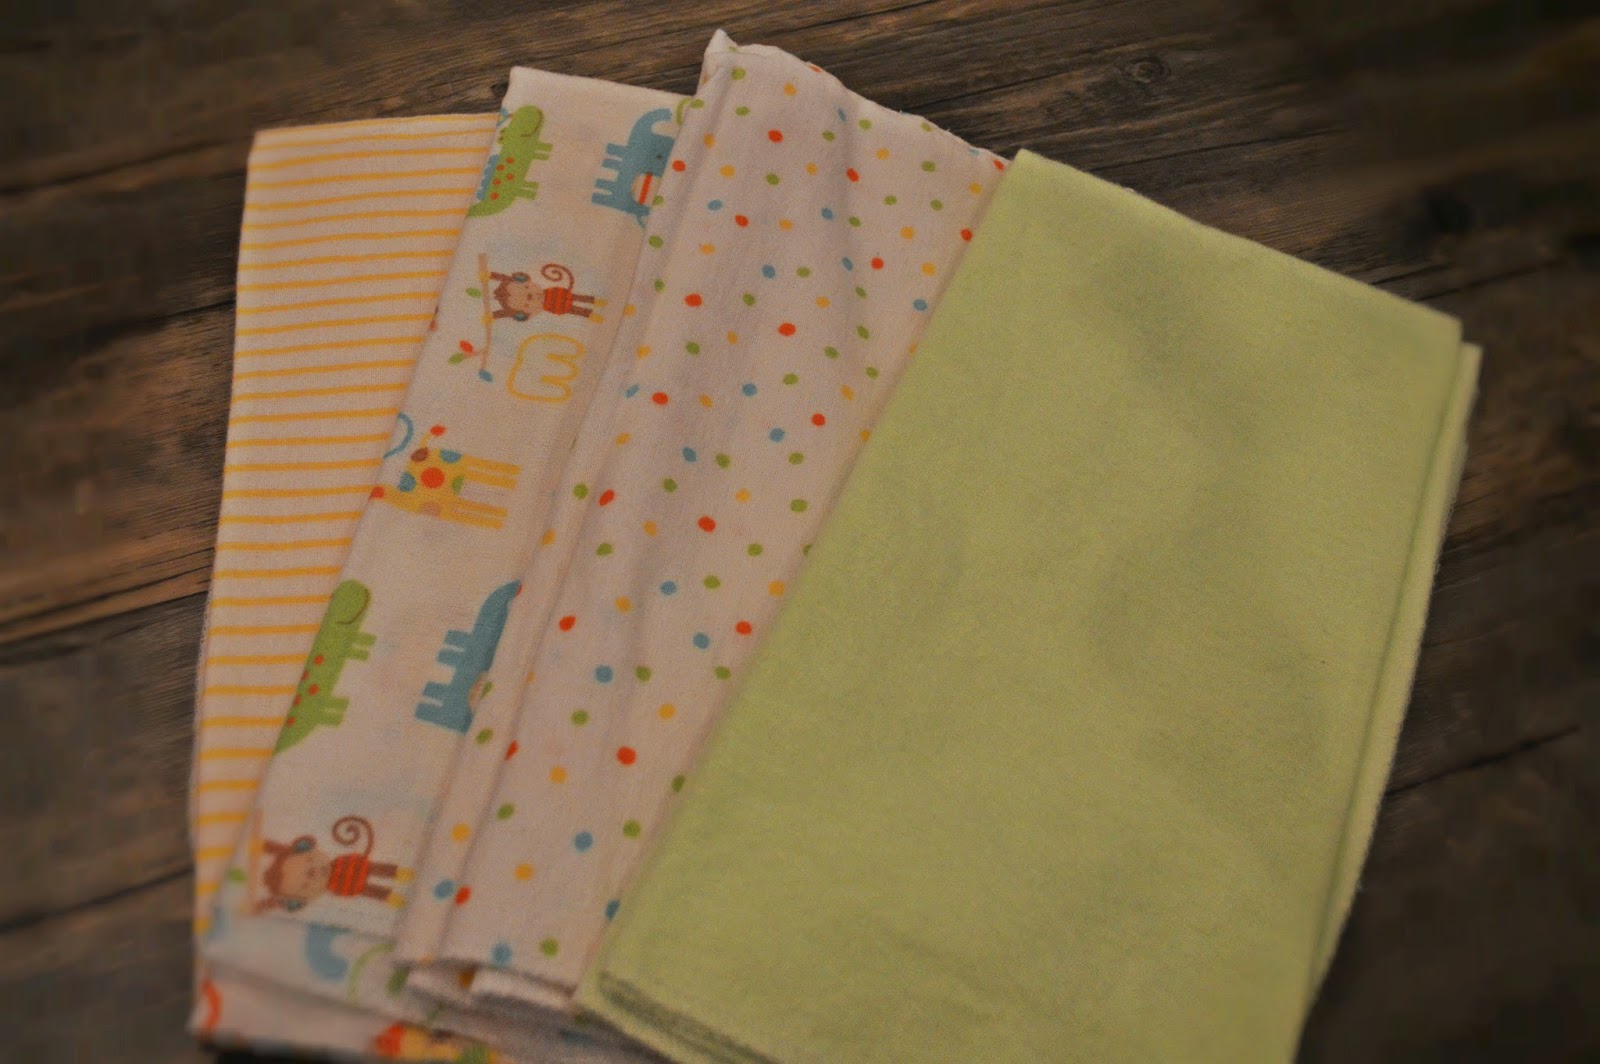
Fabric... I used a flannel fabric, but I am sure a fleece would work too as they are both soft and absorbent. You probably want to know how much fabric to buy..Well, that all depends on how small/large you want them and how many you want to make, so this will depend on what you particularly want. These are two layers thick, so keep that in mind when heading to the craft store to pick up your fabric. Flannel receiving blankets are perfect for this too!
Thread...I stayed simple with white, but you could always use an accent color to spice them up!
Sewing Machine...I just have a basic Janome. Nothing fancy, but it gets the job done and was super easy for me to figure out.
Empty Plastic Baby Wipe Container...This is where you will store the wipes and I have a SUPER COOL trick to make these bad boys pop out just like regular wipes!
First things first..Figure out how many and how big you want your wipes to be. If you have any questions, the ladies at the cutting desk are always so helpful and sweet, so don't be afraid to ask questions.
Get your scissors ready! Cut your fabric into squares correlating with the size you have chosen. Make sure that the "good" sides are facing each other and the backside of the fabric is facing out.

Time to sew! Simply stitch the edges of the square, making sure to leave an opening. You will need that opening to turn the fabric inside-out so that the pretty side is facing out.


Almost there! Gently, push the fabric through that small opening. Make sure the corners are pointy.

See that opening? Go ahead and tuck those pieces into the fabric so it lines right up with the sewn parts beside it. We will stitch this up and you won't even notice there was a hole there! If it's tricky to keep tucked, you can use some sewing pins to keep in place.

Last step! Sew around the edges of the square and you are on your way to your first wipe! I promise, you'll get better and it will go much faster as you go.

TA DA! And there you have it! An adorable, handmade and eco-friendly baby wipe! Now onto the next 20 or so:)
Now it's time for my super-duper trick to make these babies pop out of a regular baby wipe container.

1. Fold one wipe in half.
2. Slide another wipe in between the folded wipe.
3. Fold the second wipe over onto the first wipe.
4. Insert a third wipe right under the top of the second wipe.
Sound confusing? Try it out. It's much easier to grasp when actually doing it.

You will end up with a stack like so... Just place them in your wipe container and very gently, pull the first wipe through the opening. If for some reason the next one does not pop up right after, this means something went wrong with the folding process. Isn't this cool?! You know it's pretty sweet when Jordan thinks so too:)


I started using them today and I love them so far! Rather than wasting 2-3 wipes each diaper change, I have only had to use ONE! That's right, one will do the job! SWEET! These are great for whether you use cloth or disposable, however perfect for those cloth mamas out there as you can keep them in the diaper, toss in the cloth diaper load, and they are ready to go after drying!
And about that "Bum Bottom Spray"...
It is so extremely easy to make!
What You'll Need:
Coconut Oil...Just a spoonful, preferably organic, pure, cold-pressed, and unrefined.
Lavender Essential Oil...About 3 drops.
Water...A cup, hot or slightly boiled.
Spray Bottle... Any size will do.
To make, mix together the water (hot) with the coconut oil. The water temperature will melt the oil. Add your lavender drops and once the mixture has cooled down, very carefully dump into the spray bottle. A funnel may come in handy at this point;) Wasn't that easy?! It's now ready to use on your little one's bum! Simply spray and wipe dry!
So there you have it. An easy-peasy DIY project that will save you lots of money in the long run! Enjoy!
Happy Thursday!
Amber
Wednesday, July 9, 2014
Declan Brooks::Month 3
My Sweet Baby Declan,
Where has the time gone? It is so incredibly amazing how much can change in only three short months. You are blossoming into such an amazing little guy and I cannot wait to watch you grow throughout life..and cherishing those small moments.


Where has the time gone? It is so incredibly amazing how much can change in only three short months. You are blossoming into such an amazing little guy and I cannot wait to watch you grow throughout life..and cherishing those small moments.
That Personality. Full of life, love, and giggles. You definitely have me sweating when taking pictures now, as you are a little moving machine. Your smile makes me melt...And when you "talk"? Swoon. I can already tell you are going to be such a little chatty man just like your mama.
You adore ceiling fans, Mickey Mouse, Sophie, trees, being swaddled, and your daddy's silly, deep voices. Recently, you've discovered your "big boy" voice and have been practicing your vowel sounds at the top of your lungs...especially out in public. It's adorable..Well, at least for now.
You are a healthy boy. Weighing in at 15.5 lbs and saying "adios" to your 0-3 month clothes..some still with tags. And those rolls..You wear them well.
Handsome. Now I understand why everyone says that they think their baby is the cutest..Because it is true. You are the cutest little man. I love your little details..those tiny toes (lint included), fingers, eyes, nose, and peach-fuzz hair.
Milestones. Tracking, smiling, cooing, lots of movement, grasping, holding head up, sleeping through the night, discovering your fingers (you love them), and...YOU ROLLED OVER FROM YOUR BELLY TO BACK TODAY!! I am one proud mama. You totally caught me off guard and I even snapped a pic seconds before it happened.
I am so thankful that God blessed us with such a little angel. You've made me re-think life, priorities, and what being a mommy is all about.
You may be growing as fast as the blink of an eye, but you'll always be my little man.
Tuesday, July 8, 2014
Puj Splash Newborn Bath Set {Review}
Bathtime. I admit...I used to dread that word. I don't know whether it was my aching back from leaning over the bathtub, that waiting time to get the plastic tub full enough to begin, battling the bath towel to keep my little one from freezing when getting him out of the tub, or the aftermath of waiting what seemed like ages for the tub to dry out...and where in the WORLD do you store that thing?!


What seemed like such a hassle is now one of the things I look forward to most.
A few weeks ago, Puj began their search for everyday moms who could give real, honest reviews on their newest product, The Puj Splash Newborn Bath Set. I applied and upon reading the email explaining that I was chosen as an exclusive product tester, you would have assumed I just won the lottery!
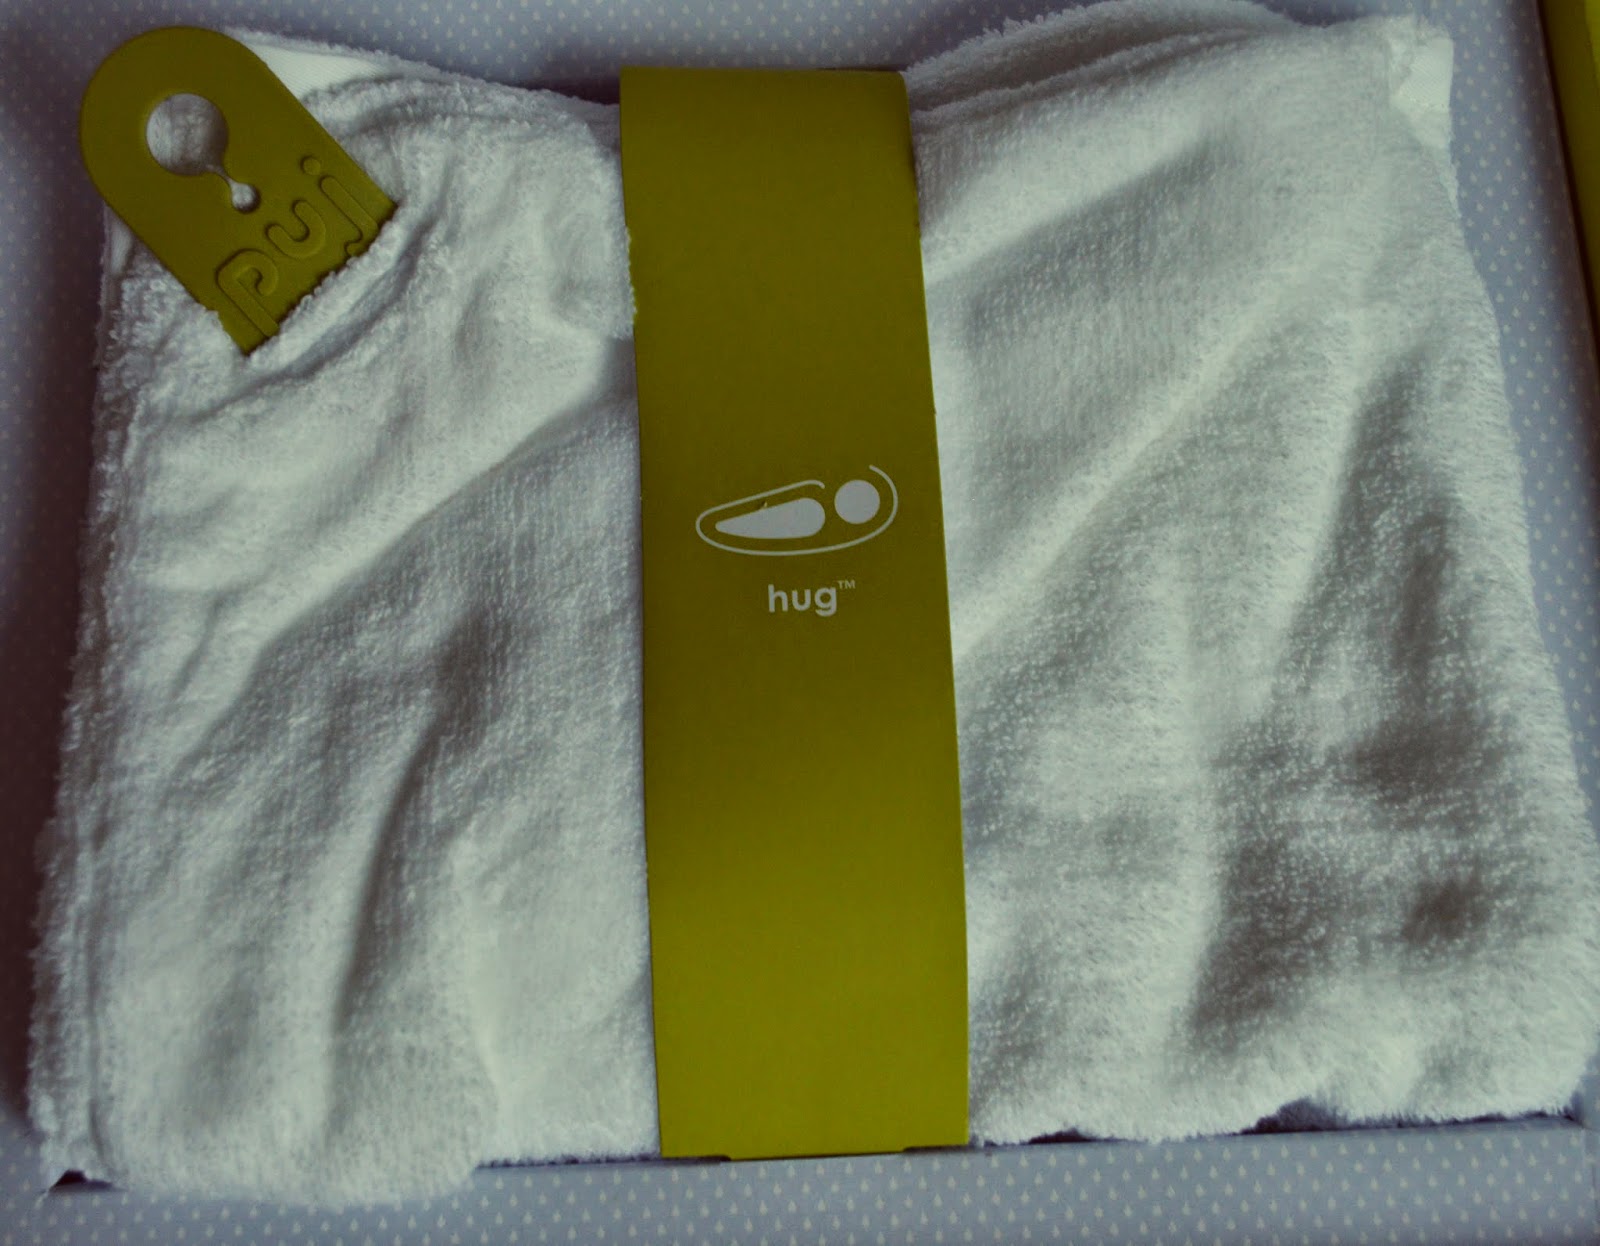
I've never loved receiving mail so much and the anticipation of getting a package is unreal...Until one day, this beauty showed up at my doorstep..
I have always heard the line, "First impressions always count." Puj did a PHENOMENAL job with their presentation of this product. Seriously. Look at it! You become a "Puj Believer" before even using the product with it's chic, simplistic, and user-friendly layout.
The Puj Splash is a 9 piece bath set. All you need is your favorite soap, a sink, and you are ready to go! Let's take a peek inside...
The Puj Flyte. Sleek. Portable. Amazing. The best part is that this innovative tub simply rests in your sink. No bending over. No achy knees or back. Plus, it provides a comfy and secure atmosphere while your little one is being washed. Another perk is that it can be easily transported and used wherever! Can you say ideal for vacation or weekend trip to your in-laws house?!
3 Fresh Bath Towels. The first thing I noticed was how soft these look, so I had to do the "feel" test and sure enough, these were even softer than they looked. They are great quality and no worrying about the edges fraying as they are durably sewn all around.
3 Puj Nubs. I absolutely LOVE that these are included in the set. They are extremely easy to apply on any flat surface and you have a convenient place to hang-dry your Flyte, wash cloths, and towel.
The Puj Hug. Oh my goodness. I mentioned before that the wash cloths were super soft...Well, how about that softness but super-sized and in bath towel-form?!? There are no words to explain how in love I am with this thing! And did I mention it allows you to pick up your little one from the tub with TWO FREE HANDS?! Simply, use the two tabs attached to the towel to snap around your neck. Pick up your little gal or guy and "hug" the towel around them. This towel eliminates that awkward "holding the towel under your chin" and "battle with the towel" scenarios. I was shocked by how easily I was able to transition my little man from the tub to the towel without him becoming cold and fussy. SCORE!
Before showing you pictures in action, I wanted to share one more thing that I really loved upon opening The Puj Splash... Not many companies take the time to actually tell you about their brand and story. I loved this. It made me excited to see real-life parents create such an awesome product and have the opportunity to help make our lives a little easier.
And bathtime begins...
This product is clearly Declan-approved. :)
This towel is extremely absorbent! Typically, our towel will be absolutely drenched and even I will get wet. Yuck! Declan was dry in a flash and I stayed dry too. Plus, the product's name is perfect because every bath literally DOES end in a hug. Perfection.
Is it bad that I am considering buying the Puj Big Hug for myself?
Clean-up literally took 2 minutes, if that. Here's where those Puj Nubs come in handy. Hang your Flyte and Puj Hug up and let air-dry.
What used to be a complete hassle turned into an enjoyable bonding moment with my little one. Not only is this product "Declan-approved" but it has also far-exceeded my expectations and receives the "Mommy Stamp of Approval".
I cannot rave enough about this company and their products. The Puj Splash would make a fantastic baby shower gift for any first-time or seasoned mama (or dad). No need to search for "the perfect" wash cloths, towels, and tub because this set has it all!
Wait, there's more! You can score The Puj Splash at 20% off with the code "SPLASHTESTER20" until July 31, 2014. Plus, shipping within the U.S. is FREE! Simply click HERE to become a new member of the Puj family:)
Enjoy!
Amber
DIY Homemade Lavender Sugar Scrub
Let's just say I am {obsessed} with this stuff. Not only do I love it because I know exactly what's in it, but also because it leaves my skin feeling so amazingly smooth. I started making it solely for my belly. It was so dry after Declan was born and I had read from various places that a sugar scrub helped with any moisture issues. And it may be coincidence, but I swear my linea negra faded after using it too..I'll blame it on the scrub;)
I quickly fell in love with this stuff and use it exclusively as a body wash now. It's so awesome that even Jordan loves it! I ran out of the first batch and he was quick to ask when I was going to make more..That's how you know it's a keeper..Plus it is SO EASY to make!

What you'll need:
Sugar (1/2 cup)...I prefer a coarser scrub, so we use Cane Sugar or Turbinado. Whole Foods sells it by the ounce, so we usually purchase from there and it's pretty inexpensive too! Regular sugar works as well:)
Coconut Oil (1/4 Cup)...Try to stick with organic, unrefined, and cold pressed. We just bought a HUGE tub (54 oz.) from Costco for only $18! You can also use olive oil as an alternative..Our family is just slightly obsessed with coconut oil for everything.
Lavender Essential Oil...You can find essential oils at health food shops and online. We purchased ours at Whole Foods for around $13. It seems like a small bottle, but a few drops go a LONG way. *You can also use other essential oils if lavender just isn't your thing ;)
Dried Lavender Buds (Ground)...Optional, but adds to the amazing scent.
Lemon...This is optional also, but I love the extra scent it adds to the scrub.
Container... I prefer glass, however you can use what works for you. A wide-mouthed 4 oz. Mason jar works great for this particular recipe amount! If you live near a Hobby Lobby, they have a glassware section with lots of options..PLUS, you can use an online coupon from your Smartphone to score 40-50% off:) Simply go here to find one.
Now, let's do this...
I try to stick with a 1:2 ratio (coconut oil:sugar). For example, I will use 1/4 cup oil for every 1/2 cup of sugar.
First, I measure out 1/2 cup of sugar and place it in my glass container which I will use to store the scrub.
Coconut Oil is typically solid upon purchasing it, but will need to be melted in order to mix it with the sugar. To melt the oil, I simply place 1/4 cup in a glass measuring cup (do not do this with plastic). To avoid microwaving, I boil water and place the jar into the boiling water until the coconut oil begins to melt. You do NOT want your coconut oil to be boiling as it will melt the sugar, which we do not want. I like this process because it gently melts the oil.
Once the oil is melted, gently pour it into the container with the sugar. It will gradually sink through the sugar. Stir.
If you think you need more coconut, you can do so and vice-versa with the sugar. You cannot mess this up, I promise:)
Once the oil and sugar is blended well, add your lavender essential oil. I typically add about 7-9 drops, but you can add more or less depending on what you like fragrance-wise. Obviously, you will need more if making a bigger batch of scrub. Stir after adding the drops.
Next, I cut the lemon in half and just spritz some in my sugar scrub mixture. Stir.
Finally, I add a tablespoon-full of ground lavender buds to the scrub, stir well, and VOILA!
You may want to stir occasionally between uses to make sure the oil and sugar are still blended well. If you notice the scrub is drying out, simply add more coconut oil.

Hope you LOVE this as much as I do! Enjoy!
Amber
I quickly fell in love with this stuff and use it exclusively as a body wash now. It's so awesome that even Jordan loves it! I ran out of the first batch and he was quick to ask when I was going to make more..That's how you know it's a keeper..Plus it is SO EASY to make!
What you'll need:
Sugar (1/2 cup)...I prefer a coarser scrub, so we use Cane Sugar or Turbinado. Whole Foods sells it by the ounce, so we usually purchase from there and it's pretty inexpensive too! Regular sugar works as well:)
Coconut Oil (1/4 Cup)...Try to stick with organic, unrefined, and cold pressed. We just bought a HUGE tub (54 oz.) from Costco for only $18! You can also use olive oil as an alternative..Our family is just slightly obsessed with coconut oil for everything.
Lavender Essential Oil...You can find essential oils at health food shops and online. We purchased ours at Whole Foods for around $13. It seems like a small bottle, but a few drops go a LONG way. *You can also use other essential oils if lavender just isn't your thing ;)
Dried Lavender Buds (Ground)...Optional, but adds to the amazing scent.
Lemon...This is optional also, but I love the extra scent it adds to the scrub.
Container... I prefer glass, however you can use what works for you. A wide-mouthed 4 oz. Mason jar works great for this particular recipe amount! If you live near a Hobby Lobby, they have a glassware section with lots of options..PLUS, you can use an online coupon from your Smartphone to score 40-50% off:) Simply go here to find one.
Now, let's do this...
I try to stick with a 1:2 ratio (coconut oil:sugar). For example, I will use 1/4 cup oil for every 1/2 cup of sugar.
First, I measure out 1/2 cup of sugar and place it in my glass container which I will use to store the scrub.
Coconut Oil is typically solid upon purchasing it, but will need to be melted in order to mix it with the sugar. To melt the oil, I simply place 1/4 cup in a glass measuring cup (do not do this with plastic). To avoid microwaving, I boil water and place the jar into the boiling water until the coconut oil begins to melt. You do NOT want your coconut oil to be boiling as it will melt the sugar, which we do not want. I like this process because it gently melts the oil.
Once the oil is melted, gently pour it into the container with the sugar. It will gradually sink through the sugar. Stir.
If you think you need more coconut, you can do so and vice-versa with the sugar. You cannot mess this up, I promise:)
Once the oil and sugar is blended well, add your lavender essential oil. I typically add about 7-9 drops, but you can add more or less depending on what you like fragrance-wise. Obviously, you will need more if making a bigger batch of scrub. Stir after adding the drops.
Next, I cut the lemon in half and just spritz some in my sugar scrub mixture. Stir.
Finally, I add a tablespoon-full of ground lavender buds to the scrub, stir well, and VOILA!
You may want to stir occasionally between uses to make sure the oil and sugar are still blended well. If you notice the scrub is drying out, simply add more coconut oil.
This is a perfect way to pamper yourself whether you use it daily or every so often. Not only will you smell divine, but your skin will be exfoliated and moisturized too! No worries about what scary things or chemicals are in it either. Yay!
Warning: This scrub is oil-based, so it does make the shower a little slippery until it rinses away, so be careful!
Hope you LOVE this as much as I do! Enjoy!
Amber
Subscribe to:
Comments (Atom)